It is important to protect yourself, now more than ever, in the digital realm. In today’s world, technology is rapidly advancing. Unfortunately, there are also advances in the so called “dark side” of technology. Viruses, worms, and malware are all increasing in distribution and in complexity. Many methods and systems exist to help protect you against these malicious agents and a layered approached is considered to be best security practice. One such layer is called an Intrusion Detection System or IDS for short. Intrusion detection is the process of monitoring computer and network activities to find breaches of security and/or possible computer/network abuse/misuse. There are basically two kinds of Intrusion Detection Systems-Network-based Intrusion Detection System (NIDS) and Host-based Intrusion Detection System (HIDS). A network-based IDS analyzes the network activity to determine if any security breaches or computer security incidents have taken place or are in the process of taking place. A host-based IDS revolves around changes in behavior and detailed logging of the particular host it is monitoring. There are advantages and disadvantages to each system. In this paper I will be focusing on network-based intrusion detection.
There are a few methods for implementing network-based intrusion detection. Analyzing traffic with signature matching, which is like how some anti-virus software works; or analyzing traffic using a baseline to establish a normalcy and determine whether unusual activities are taking place-like when a packet comes in on a different port than what the service normally uses, i.e. an SSH packet with a port number other than 22. The drawbacks to using the signature method are: just like with anti-virus signatures, the signatures the intrusion detection system uses must be current and up to date and there may be some vulnerabilities that are unknown and go unnoticed, or the attacker could change the pattern of his attack packets as to go undetected. The drawbacks of the baseline method are: there may be legitimate traffic on unconventional ports; protocols do not always follow their respective RFC’s; and a network is a dynamic entity which may be always changing so therefore the baseline must also be dynamic.
For this paper I will be experimenting with a program called Snort. Originally, the Snort program was just supposed to be a packet sniffer, which is a program that intercepts packets to be analyzed in real time. But Snort has expanded to be a packet sniffer, packet logger and also a network intrusion detection system-thus, since it is a sniffer and more, it is named Snort. Snort is a modular program consisting of many different parts. One obvious part is the sniffer, which is a libcap application-which another sniffer named “Tcpdump” also uses. The next part of Snort is called the preprocessor. The preprocessor uses different plug-ins to initially analyze the packets and decide what goes for further analyzing. This is useful to cut down on potential false positives, which is when you get an alert for something that is actually valid. This is also useful because you can turn on or off the different plugins to customize Snort for your network’s needs. The next part of Snort is the detection engine. The detection engine is where signature-based intrusion detection happens by using a bunch of rules. The rules are categorized by Trojan horses, buffer overflows, access to various applications, and various other categories. These rules can be downloaded and should be updated often, since new attacks and signatures are discovered. Snort also gives the user the ability to customize and write their very own rules. Rules are made up of a header and an option. The header is made up of what to do:log or alert; type of network packet: tcp/udp/icmp/etc., source and destination IP addresses and ports; an alert message and possibly some qualifiers. The option is made up of what to match in the packet content (the signature), a classification type, a reference and a revision number. I have provided a sample outlining its various parts (see figure 1).
Figure 1. A sample Snort rule and its various parts

When Snort finds a packet that matches the offending signature, it follows the action listed in the rule. There are eight actions that are possible but the two most common are alert and pass. The alert action produces an event, which can be logged, emailed, and sent via SMB message to a Windows machine. The pass action simply means that if the signature matches the packet, do not generate an event and stop processing the packet. Please see figure 2 below for an example of a logged event.
Figure 2. A sample alert event log.
05/07-06:29:19.956118 [**] [1:527:8] BAD-TRAFFIC same SRC/DST [**] [Classification: Potentially Bad Traffic] [Priority: 2] {UDP} 0.0.0.0:68 -> 255.255.255.255:67
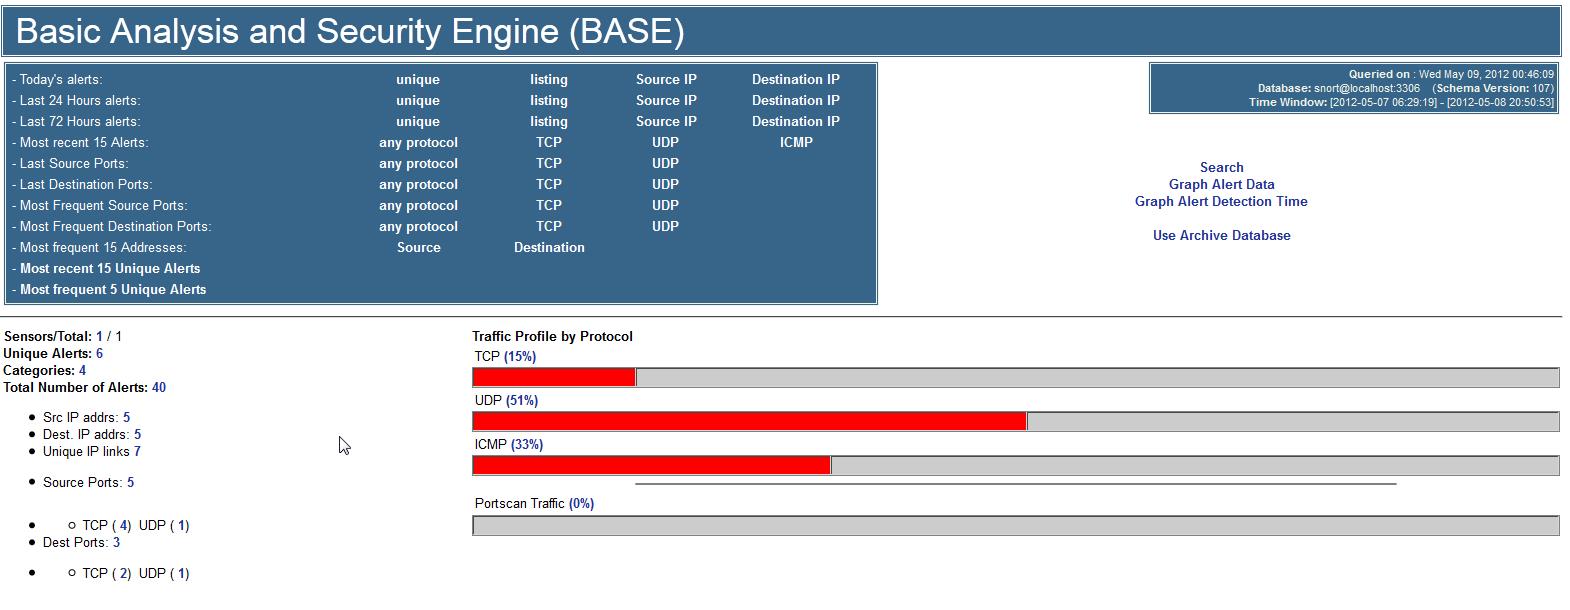
It can be difficult to sift through many of these alerts, since a system could generate thousands of these a day, depending on the network type and traffic. There have been some programs developed to help analyze these events. One such program is called BASE, which stands for Basic Analysis and Security Engine. BASE is an Apache application that uses SQL tables to parse and analyze Snort alert events. See figure 3 for a screenshot showing the “home” page which shows lots of useful information for quick analysis, such as events by protocol.
Figure 3. A screenshot showing the BASE home screen webpage with useful information.
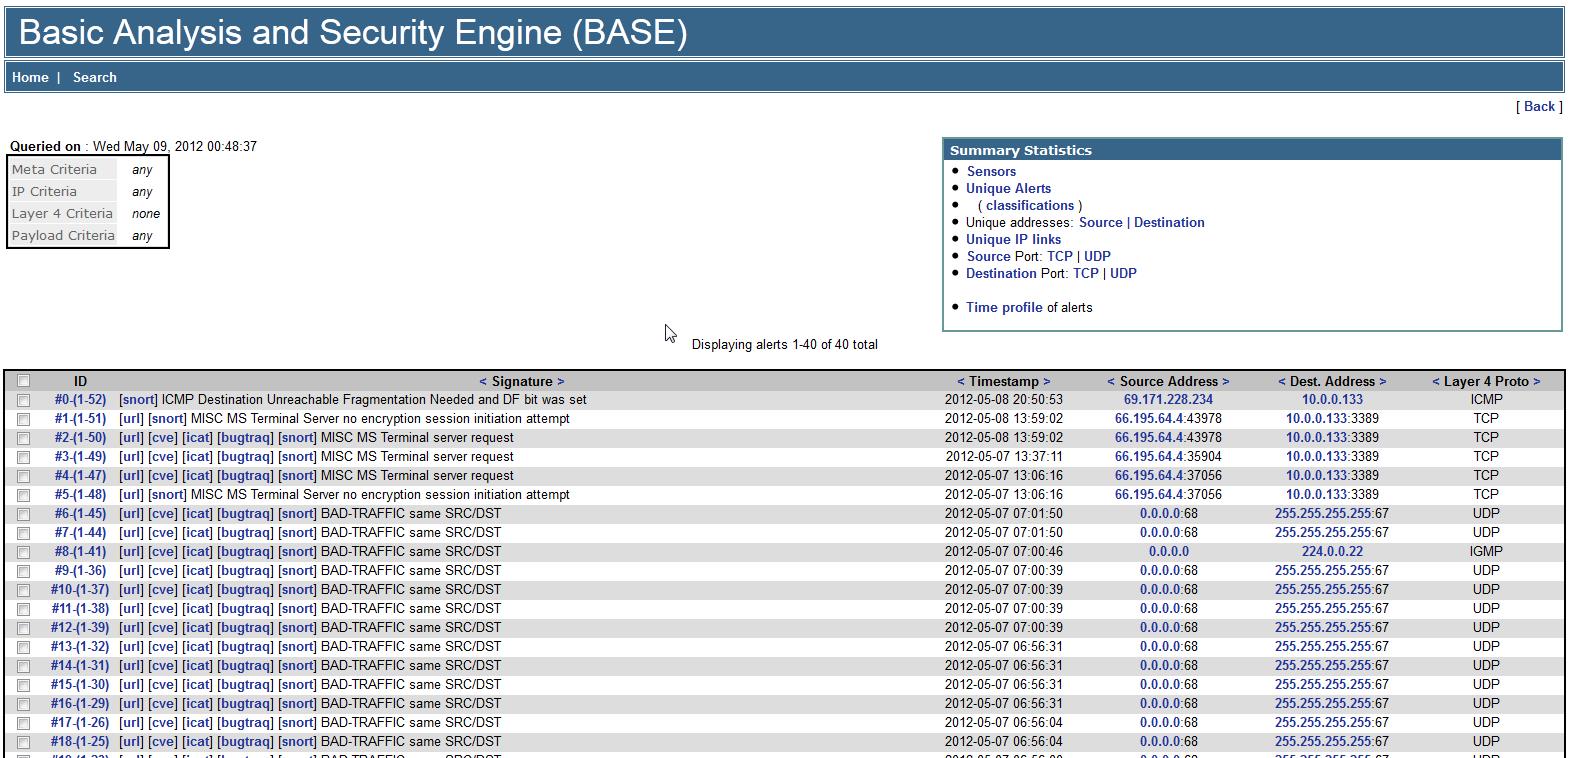
There are many links you can click on to get more information. For example, clicking on the total number of alerts will bring you to a page listing all alert events with their ID’s, signatures, timestamp, source address, destination address, and their layer 4 protocol (see figure 4).
Figure 4. A screenshot showing all alert events with some important details.
There are some nice options on this page, such as links to external resources explaining the possible attack (see figure 5).
Figure 5. Clicking on the Snort link in the event listing can bring you more information about the possible attack.

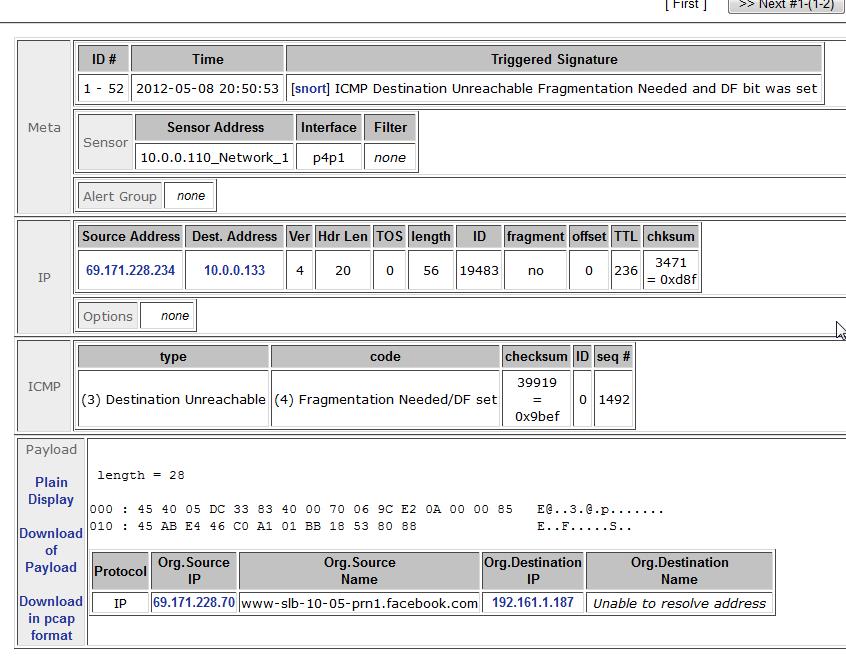
Clicking on the ID brings you to even more event detail, including the actual contents of the packet that triggered the alert (see figure 6).
Figure 6. A screenshot showing the alert event in detail.
For my experimenting with Snort, I had read about a live Linux distribution based on Fedora called the Network Security Toolkit (NST). NST is very handy because it comes with all the necessary “ingredients” already installed and configured to work together, such as SQL, BASE, Snort and many other useful utilities/programs. I downloaded the image file and burned it to DVD. I then used this live DVD to boot one of my laptops on my home network. Initially, I tried using a hub in between my cable modem and my router to try to catch all incoming and outgoing traffic with the probe laptop. However, the only traffic I was seeing (I used Wireshark to capture traffic before turning Snort on) was ARP requests and replies-I was not seeing any TCP traffic. I had read that a reason for this could be because the hub runs the different speeds on different backplanes, meaning 10 Mbps traffic would be separated from 100 Mbps, and my laptop/router was set to auto-negotiate at 100 Mbps. After doing some research, I was able to find firewall rules for my router (DD-WRT) that would forward a copy of all incoming and outgoing traffic to a specified IP address by using these commands below:
iptables -A PREROUTING -t mangle -j ROUTE –gw 10.0.0.110 –tee
iptables -A POSTROUTING -t mangle -j ROUTE –gw 10.0.0.110 –tee
I simply logged into my router using SSH and entered these commands. Now, when running Wireshark, I can see all traffic (TCP included) going in and out of my router from any port.
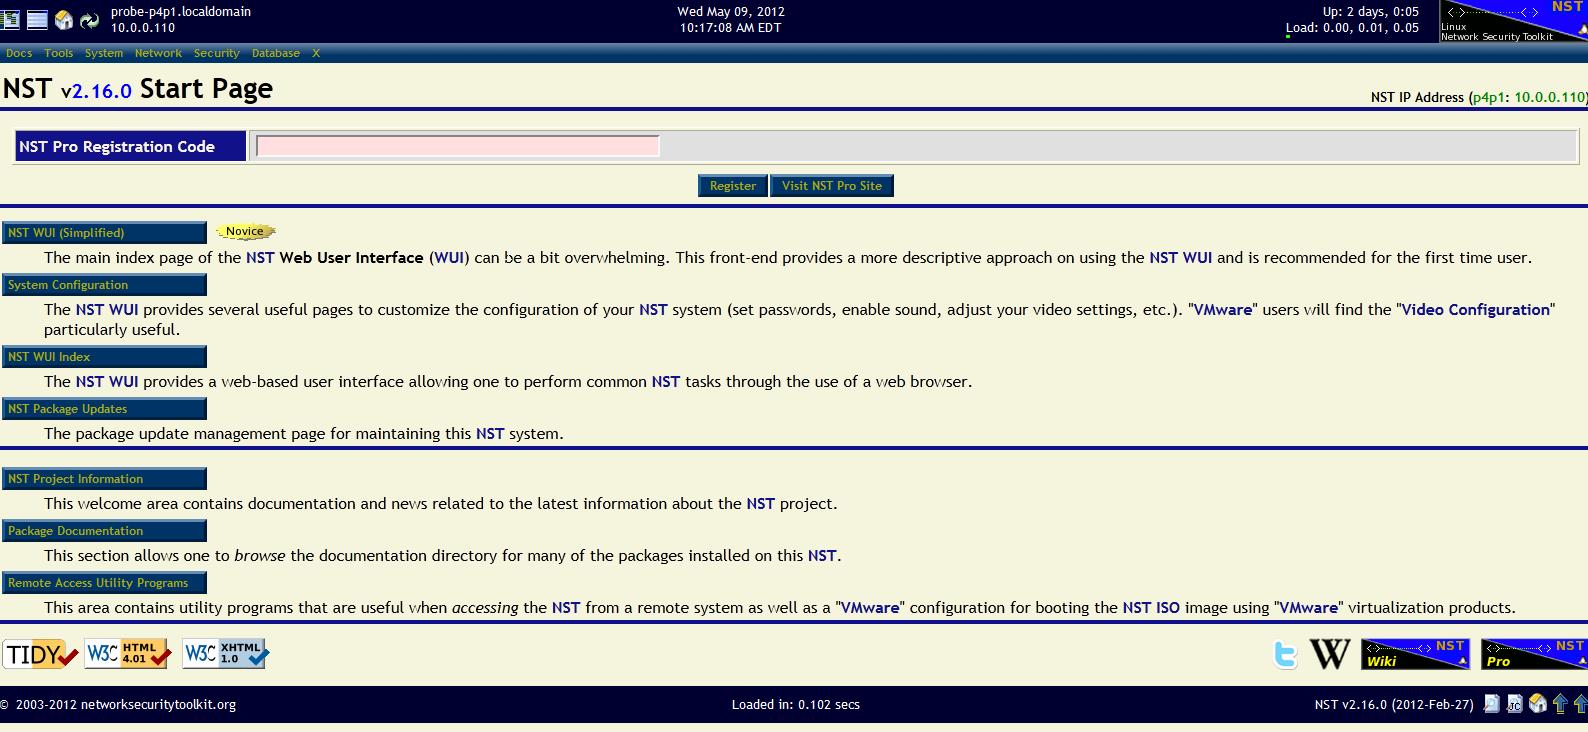
The network security toolkit provides several boot options: console, graphical desktop, etc. For my initial interactions with the NST I booted into graphical desktop mode, however this is not necessary-most, if not all, functions can be performed through a web interface. Also it is better to boot into console mode, that way the kernel doesn’t have to focus on unnecessary things like drawing windows and you will have less of a chance of it dropping packets-and dropping packets could be bad-you could potentially miss an attack. The initial password for root user is “nst2003”-you must run “nstpasswd” to change this password and this script will also setup the web server for configuring and interacting. After booting into console mode, since I have a static IP address chosen for the probe for traffic forwarding purposes, I can log on to the probe machine via web browser with HTTPS and get to the home page (see figure 7).
Figure 7. The home screen for NST provides links to many resources, such as system configuration, sensor configuration, etc.
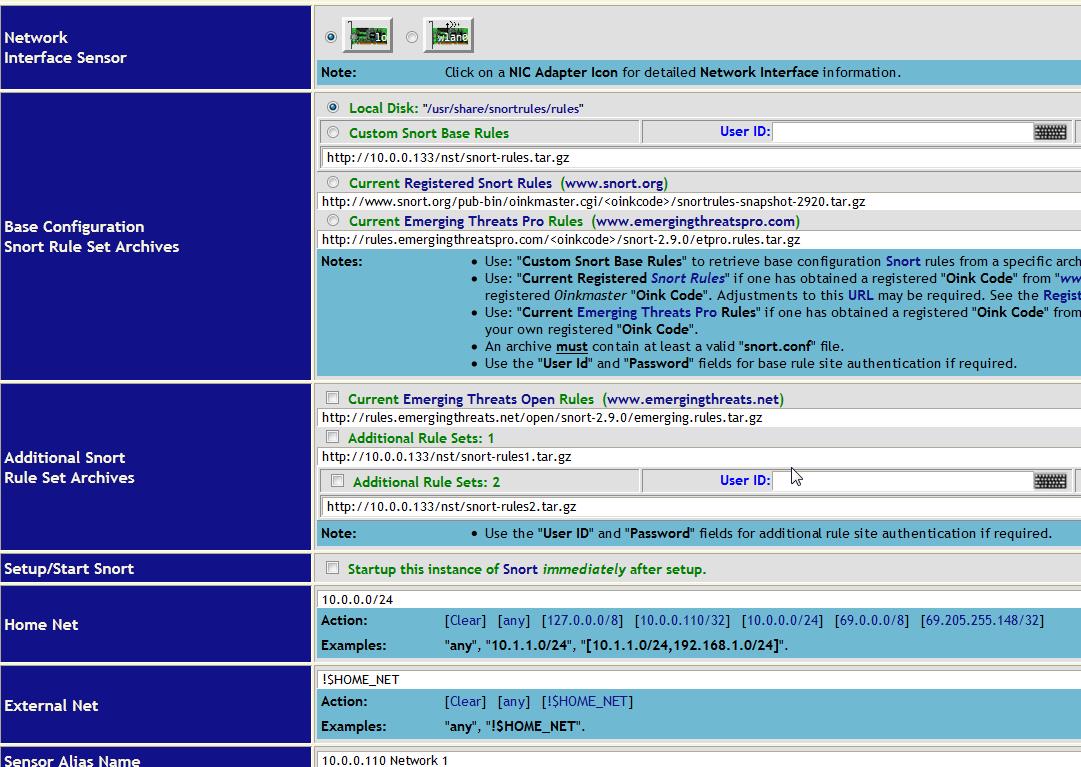
Choosing the “NST Web User Interface (simplified)” link takes you to four other links with nice descriptions: Network tools; System Information; System Administration; and Serial port tools. To setup Snort, I clicked on the network tools link. This brings you to another page of links-click on “Network Monitoring”. This take you to yet another web page with several options, but for Snort click on the IDS(Snort) link. This will take you to a page with four options: Snort Administration; BASE Interface; Snorter Summary; and Email Snort Alerts. To setup Snort, I clicked on Snort Administration. This comes up with a web interface to help you configure Snort. Basically, for your first interaction you can click what network interface you want Snort to run on and then click setup/start Snort. However, to cut down on the number of false alerts, I configured some other options as well, such as picking the value for my home network address and picking everything but my home network addresses for external net (see figure 8).
Figure 8. The NST web interface for configuring Snort.
This will setup an SQL database for your alert events automatically and you can go to the BASE page to view them. There is also a handy option to email alerts to you. You can set a critical number of events (limit) and also get a report emailed to you every hour (it runs as a Cron job on the Fedora operating system) see figure 9 for a report that was emailed to me after setting up Snort and SnortSlinger.
Figure 9. A sample report emailed to me by the SnortSlinger perl script ran as a Cron job.
From: snortslinger@deweyweb.dyndns.org
To: deweyga@acad.sunybroome.edu
Subject: SnortSlinger Report : 3 new alerts
Date: Mon, 07 May 2012 18:01:03 +0000
#################################################################
### Quick Summary:
### ————————————————————-
### Events in last hour: 3
### Events in last day: 49
### Events in last week: 49
### Total events in database: 49
###
### Report Generated: Mon, 07 May 2012 18:01:02 GMT
#################################################################
#################################################################
### Statistics for the last hour
### =============================================================
### Top 5 Events
### ————————————————————-
### Count | Event Type (SID)
### ————————————————————-
### 2 | MISC MS Terminal server request (1448)
### 1 | MISC MS Terminal Server no encryption session initiation attempt (2418)
### =============================================================
### Top 5 source IP addresses:
### ————————————————————-
### Count | IP address
### ————————————————————-
### 3 | 66.195.64.4
### =============================================================
### Top 5 destination IP addresses:
### ————————————————————-
### Count | IP address
### ————————————————————-
### 3 | 10.0.0.133
#################################################################
#################################################################
### Statistics for the last 24 hours
### =============================================================
### Top 10 Events
### ————————————————————-
### Count | Event Type (SID)
### ————————————————————-
### 33 | BAD-TRAFFIC same SRC/DST (527)
### 12 | ICMP Destination Unreachable Communication with Destination Host is Administratively Prohibited (486)
### 2 | MISC MS Terminal server request (1448)
### 1 | INFO web bug 0x0 gif attempt (2925)
### 1 | MISC MS Terminal Server no encryption session initiation attempt (2418)
### =============================================================
### Top 10 source IP addresses:
### ————————————————————-
### Count | IP address
### ————————————————————-
### 21 | 0.0.0.0
### 12 | 66.135.62.191
### 3 | 66.195.64.4
### 1 | 74.125.228.2
### =============================================================
### Top 10 destination IP addresses:
### ————————————————————-
### Count | IP address
### ————————————————————-
### 20 | 255.255.255.255
### 6 | 69.205.255.148
### 6 | 10.0.0.143
### 4 | 10.0.0.133
### 1 | 224.0.0.22
#################################################################
+——————————————–+
| Output generated by SnortSlinger: |
| http://www.venom600.org/code/SnortSlinger/ |
+——————————————–+
NST has many other tools and options, too many to list for the scope of this paper, but I find it to be an excellent resource which makes setting up an IDS sensor fairly easy for the novice. So far the data I have collected hasn’t been too exciting. I have had some false calls, such as “Bad traffic” (which is more of a network configuration problem rather than an attack) and “ICMP destination unreachable” (another network configuration problem and not likely an attack). I turned some of these rules off because I am not interested in these event alerts. This is probably one of the few times I actually want someone to try an “attack” on my network.
Snort has some advanced features, which enhance its appeal as a valuable open source tool. One of these features is IPS, or Intrusion Prevention System. There is an “inline” option where you can choose to put Snort at the gateway of your external network connection and it will run like a firewall-choosing what packets to forward and which ones to drop based on the rules. Perhaps in the future I will experiment with this option. Snort is a valuable asset and I will continue to learn about it and its configurations because I believe it is an untapped resource.
References
Crothers, Tim. (2003). Implementing Intrusion Detection Systems: A Hands-On Guide for Securing the Network. IN, USA: Wiley.
Kohlenberg, Toby, et al. (2007). Snort IDS and IPS Toolkit. MA, USA: Syngress.
Network Security Toolkit: http://networksecuritytoolkit.org/nst/index.html


 Finally, here is a


 .
.

